Der Tiger ist endlich fertig geworden. Hier ein paar Bilder dazu. Mehr könnt ihr auf meiner Website - Tiger Galerie sehen.
The tiger is finally finished. Here are some pictures to it. Everything you can see to my website - Tiger gallery.
Montag, 11. April 2011
Mittwoch, 9. März 2011
Tiger I by AVF Club - sSS PzAbt.101 - France 1944
Für mein Diorama von Miniart "French Street" habe ich das erste Fahrzeug im Rohbau fertig. Ein Tiger I von AVF-Club, mit PE von Voyager, einem Alurohr von Lionroar und Ketten von Friul. Das Zimmerit habe ich selbst aus 2 Komponenten Kfz-Spachtel hergestellt. Jetzt geht es weiter mit der Bemalung des Panzers.
The primer with Mr.Surfacer 1000 by Gunze.
The pre-shading with dark gray from Tamiya.
The first color RAL 7028, dark yellow by LIFECOLOR.
The second color RAL 6003 olive green by LIFECOLOR.
The third color RAL 8017, red-brown of LIFECOLOR. The camouflage pattern of 2./sSS PzAbt101 in Normandy.
I've placed two filters. First, gray for the dark yellow and brown-ocher for the camouflage pattern.
The aging of the tank turret is ready. The sequence: washing, dry brushing, chipping, fading and pigments.
For my diorama by Miniart "French Street" I have the first vehicle will be structurally complete. A Tiger I of AVF Club, with PE of Voyager, an aluminum barrel of Lionroar and tracks of Friul. The Zimmerit have made of 2 components autombile putty by myself. Now it goes to the paint.
The primer with Mr.Surfacer 1000 by Gunze.
The pre-shading with dark gray from Tamiya.
The first color RAL 7028, dark yellow by LIFECOLOR.
The second color RAL 6003 olive green by LIFECOLOR.
The third color RAL 8017, red-brown of LIFECOLOR. The camouflage pattern of 2./sSS PzAbt101 in Normandy.
I've placed two filters. First, gray for the dark yellow and brown-ocher for the camouflage pattern.
The aging of the tank turret is ready. The sequence: washing, dry brushing, chipping, fading and pigments.
Sonntag, 27. Februar 2011
4 Figures for my French Street Dio
Die nächsten 4 Figuren für mein "French Street"- Diorama sind fertig bemalt. Der alte Mann mit Schaufel ist von Alexander Miniatures, der nächste ist von Alpine Miniatures mit einem Hornet Kopf (sieht besser aus), der dritte und der vierte sind von Royal Model. Bemalt wurde wie immer mit Vallejo Acryl Farben.
Jetzt sind 10 Figuren fertig, aber es müssen noch weitere 10 bemalt werden.
The next 4 pieces for my "French Street"-Diorama are painted finished. The old man with a shovel is from Alexander Miniatures. The next ist from Alpine Miniatures with a Hornet head (it looks better), the third and fourth are from Royal Model. Was painted as always with Vallejo acrylics. 10 figures are now finished, but still needs another 10 to be painted see at next time.
Sonntag, 6. Februar 2011
"French Street" - Base finished
Hallo Modellbaufreunde,
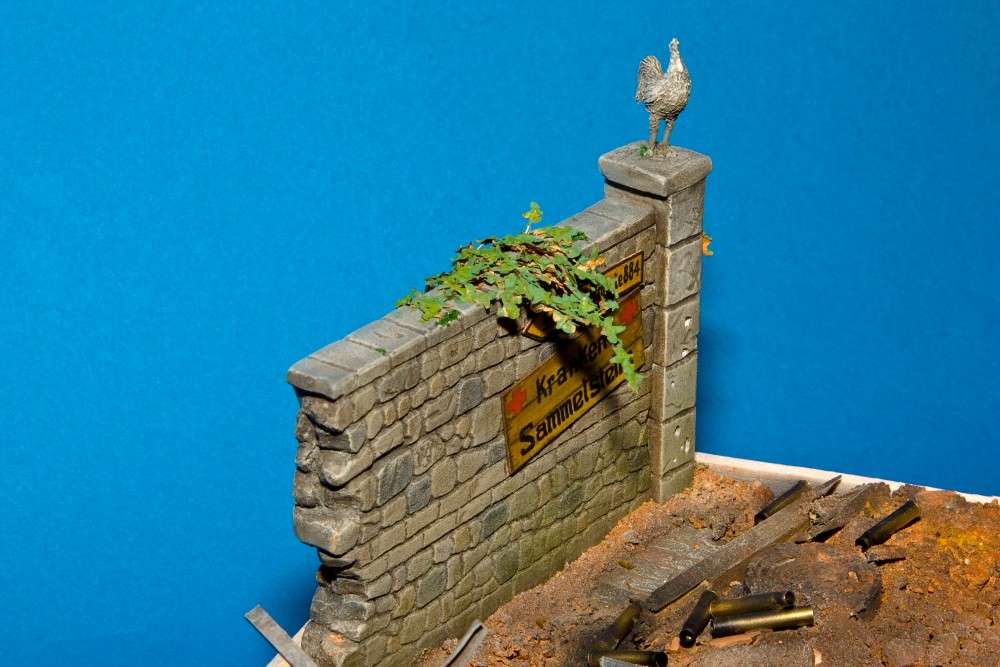
Es ist geschafft - die Base ist fertig. Ich habe 10 Tage dazu gebraucht den Bodengrund und das Haus fertig zu bemalen und zu verwittern. Dabei wurden in den Schutt viele Kleinteile mit eingearbeitet. An die kleine Mauer habe ich noch etwas Efeu mittels kleiner Geranien-Wurzeln und Birkensamen angebracht. Die Fachwerkmauer habe ich nochmals komplett überarbeitet und verwittert. Schaut euch die Fotos an. Als nächstes geht es mit den Fahrzeugen und den Figuren weiter. Über Kommentare würde ich mich freuen.
Gruß Olav
Hello friends,
It's done - the base is completed. It took me 10 days to the substrate and the house ready to paint and weather. Here I have inserted into the rubble, many small parts. At the low wall I have some ivy with small roots of geranium and birch seeds attached. The bricks in the timber I've once again completely revised and weathered. Check out the photos. Next, we continue with the vehicles and the figures. I would appreciate any comments.
Greets Olav
Samstag, 22. Januar 2011
"French Street" the next Step
Hallo Modellbaufreunde,
Endlich kann ich an meinem Diorama „French Street“ weiterbauen. Ich wollte eigentlich einen normalen Sockel unter die Base kleben. Da jedoch der vorgegebene Platz recht wenig war, habe ich mich entschlossen alles ein wenig zu vergrößern.
Als erstes wurde die Original Base auf ein Stück Schaumpolystyrol geklebt, wobei die Grundfläche sich 5,5 cm nach rechts und 8 cm nach vorn vergrößerte. Der nächste Arbeitsschritt war das Angleichen des Untergrundes mittels selbsthärtender Modelliermasse. Kleine Unebenheiten wurden mit Zahntechniker Gips ausgeglichen. Nach 24 Stunden aushärten habe ich das Pflaster mittels Graviernadel und Fräser nachgraviert. Während dieser doch etwas langwierigen Arbeit kam mir der Gedanke, noch einen Bombentrichter mit in das Gelände zu modellieren. Das ist der derzeitige Baufortschritt.
Gruß Olav
Hello friends,
At last I have time to continue building on my diorama "French Street ". I really wanted to stick a normal base in the finished base. However, since the existing space was very little, I've decided to increase everything.
First, the original base on a piece of polystyrene foam was glued, with the base located 5.5 cm to the right and 8 cm in front enlarged. The next step was the raising of the ground by means of self-hardening modeling clay. Small bumps were compensated with dental plaster. After the mass hardens 24 hours, I have engraved the cobblestones with an engraving needle and cutters on. During this tedious work I had the idea to model even with a bomb crater in the ground. This is the current construction progress.
Greets Olav
Abonnieren
Posts (Atom)